In November 2021, we decided to take the plunge, remove our gas boiler and have an air source heat pump fitted. The main driver was to reduce our personal carbon dioxide emissions: our heating and hot water generated around 3.26 tons CO2 per year, and we thought that with a heat pump we could get that down to around 0.9 tons, and that this would reduce as the grid decarbonises. However, I will admit that we were also curious as to how it would work.
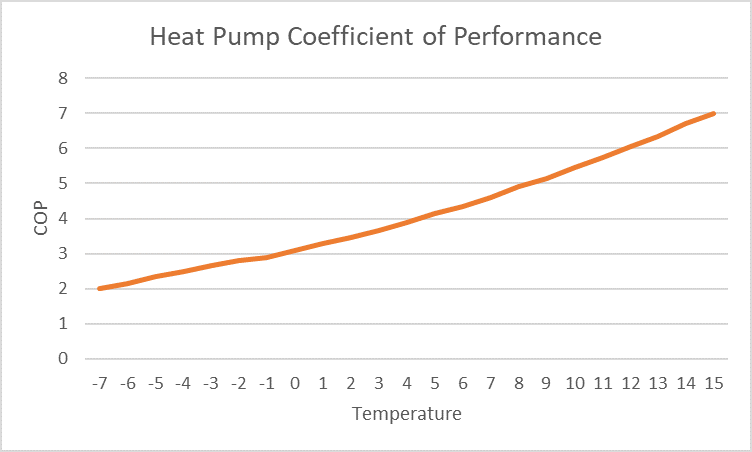
A heat pump is essentially a fridge working backwards, extracting heat from the air and delivering it to our home. If you burn gas in a boiler you get less useful heat energy out than the energy you put in. The great thing about a heat pump is that, because it extracts energy from the outside air, you get more, useful heat to your home than the electricity you use to run the pump. At least twice as much! This ratio of heat energy out vs electrical energy in is known as the coefficient of performance or COP. When it’s cold the heat pump has to work harder to extract heat from the air and therefore has a lower COP. As it warms up the COP also improves. This graph shows how the manufacturer’s stated COP of our heat pump varies with the outside temperature:
Installation
The first stage to getting a heat pump fitted was to calculate the heat loss from our home. Our supplier, Xpert Energy, created a model of our house, and calculated the heat loss through walls and roofs by room, both to give a total heat required to size the heat pump, and to that they could also check the size of radiator required for each room.
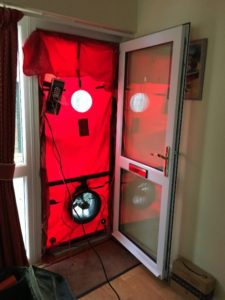 We also had an air tightness test to check how airtight our home is. This involved putting a large fan in our front door, raising the air pressure in the house slightly, and looking at how quickly this went down. This was optional, but in our case worth doing, as our house is pretty airtight for its age, and having this evidence enabled us to buy a smaller heat pump.
Overall, the calculation said that at -3 oC, our house would need 6kW to maintain an internal temperature of 21 oC.
A heat pump is much more efficient when it is heating the water to a lower temperature, so the best strategy is to have larger radiators running at a lower temperature, or underfloor heating. I had been afraid that every wall would need to be covered in radiators, but in the event about half our radiators were big enough already although we did decide to change most of them anyway. The new radiators were all actually smaller and a little deeper than our existing radiators, so that was one fear allayed.
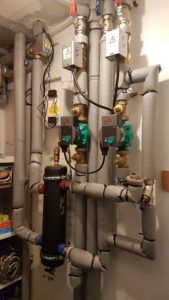
The installation took about 2 weeks. It was more disruptive than it needed to be because of our decision to change all the radiators, and there is quite a lot of gubbins (technical term!) pictured below that we had to find space for. On the positive side, we’ve gained a cupboard where the boiler used to be.

We also had to have a new larger hot water tank. As the heat pump heats the water to a lower temperature than a boiler you need more water from your hot tap and less from your cold to fill a bath. Fortunately, the larger hot water tank still fitted in our airing cupboard (just!).
I had been very nervous about how noisy the heat pump would be as Silchester is so quiet, but I think it makes less noise than the exhaust from a gas boiler. So that was my biggest fear allayed.
We have a separate electricity meter for the heat pump, so we can see daily how much energy we used. There is a very close correlation between external temperature and energy usage. This is the data for November:
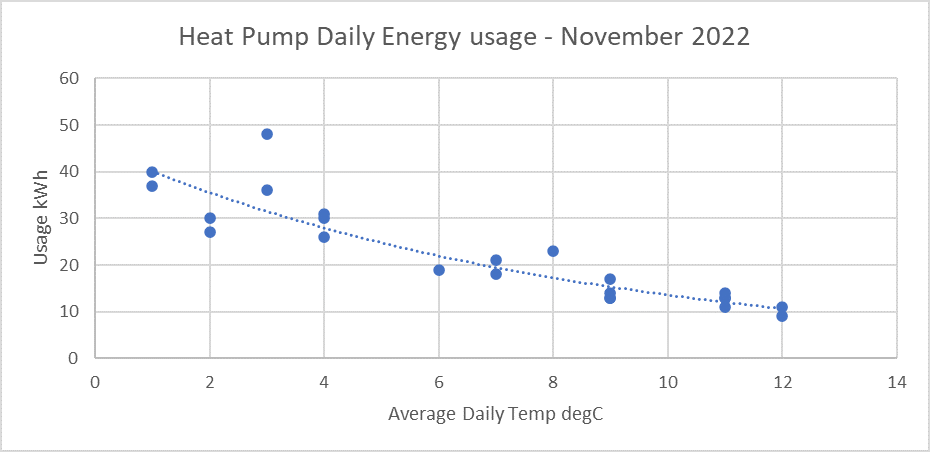
The benefit of this close correlation is that it is very easy to try different heating strategies, and quickly see the effect on energy usage.
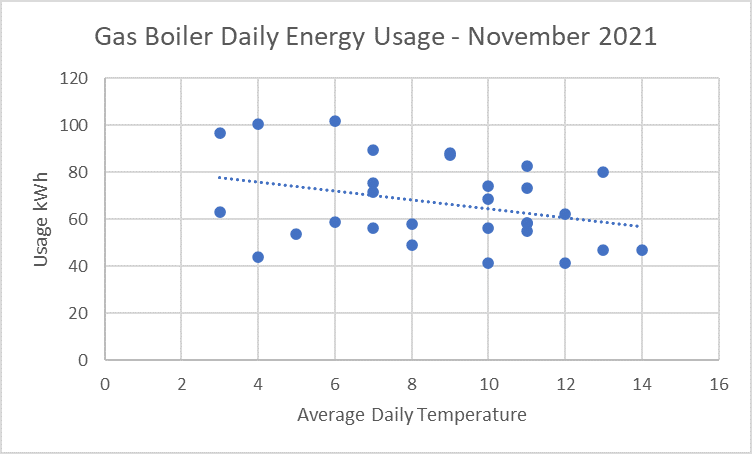
For interest, I also looked at the correlation between our gas usage and external temperature. This was our gas usage for November 2021:
Heating Strategy
We now have a thermostatic radiator valve (TRV) on every radiator, separate upstairs and downstairs heating circuits with thermostats, and the heat pump regulates the temperature at which it circulates water depending on external temperature.
We had been told that the most efficient way to heat our home was to leave the heating on at a steady temperature all the time. This seems counter-intuitive. Since the house loses less heat when it is at a lower temperature, surely it is more efficient to only heat it when you need the heating?
After experimenting for the last 3 months, I can report that they were right!
Initially, we tried to control the heating like we did with a gas boiler, setting the temperature to warmer in the mornings and evenings and cooler overnight and during the day. However, we struggled to get the house warm at the right times.
After a while, we stopped changing the thermostats and reduced the temperature at which the water circulates round the radiators by a couple of degrees so that the thermostats rarely do anything. The house got warmer, it felt more pleasant because the radiators were always on and the energy usage didn’t go up. I’m told that in Sweden they don’t bother to fit thermostats to houses at all – the heating is simply controlled by sizing the radiators correctly and adjusting the water flow temperature and I can now see why.
I think that the reason is that reducing the temperature at which the water goes round the radiators by 2oC cut our energy usage by about 10%, which compensated for the slightly higher average temperature in our home.
Cost
One of our criteria for fitting a heat pump is that we didn’t want our energy bills to go up as a result, so how have we done so far? January is traditionally the month in which our heating bills are highest.
In January 2021, we used 2741.9 kWh of gas, generating about 600 kg CO2
In January 2022, which had a very similar average temperature, our heat pump used 962 kWh of electricity, generating about 170 kg of CO2.
Utility prices are in turmoil, but at our current prices the energy used by the heat pump was 10% more expensive over the month than gas would have been (not counting the savings on the gas standing charge). Since the heat pump is expected to be less expensive than gas as the weather warms up (I think the breakeven point is about 6oC), so far it’s looking about where we expected it to be.
Overall

It’s taken a couple of months to get used to it, but we are very happy with our heat pump.
The temperature of the house is much more stable, and generally warmer than we used to have it when we had a gas boiler. We cut our carbon emissions in January by about 400kg, and although not the most beautiful piece of kit, our heat pump is quiet and delivering the expected performance.

 We mixed the Fusion adhesive. It is a powder and liquid and mixed in a 1:1 ratio. Once mixed the mix is allowed to sit for a few minutes. During this time the powder dissolves into the liquid to create a liquid so slowly thickens. An adhesive tape was used to create and seal the base and thus form a dam to hold the Fusion mix in place while it cures.